

I found a book in the local library which taught me the following method of producing a paperback from separate sheets of A4 or A5. I reckon it is suitable for volumes up to up to 2cm thick
Materials needed : Vice or
Workmate to grip the book tightly. Glue or paste; I use PVA
medium, available from hardware shops. Paintbrush for glue, 1cm
wide approx. Large holed needle or bodkin and strong thread; I
use carpet thread. Hole driller; I use an electric drill.
1. Knock the pages up so that they form a tidy block, grip them securely, and glue the spine. Allow two hours minimum to dry.
2. With either a drill, or a hammer and nail, or a bradawl, pierce seven holes 6 mm in from the spine, spaced along ready for the sewing. If the gluing tends to come undone in the process, never mind; after sewing, reinsert the block in the workmate for twenty seconds to make sure the pages are tight together again before sewing.
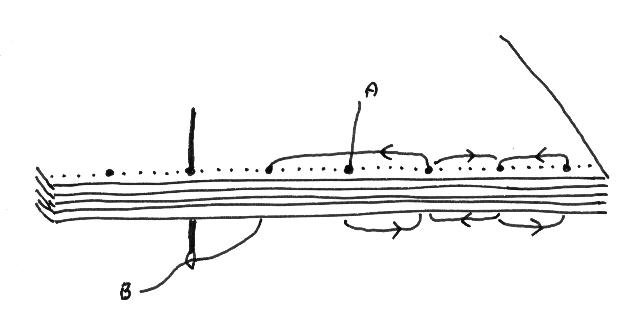 3. Sew figure of eight style as shown in the diagram.
Set off downwards from the top of the volume through the middle
hole. Note that when you return to the middle hole on the way
back, you bypass it, leaving a longer section. Then at the the
end of the run, bring the thread up on the other side of this
longer section, which allows you to knot the two ends A and B as
shown in the second diagram. Make the sewing as tight as you can
before knotting. I use three overhand knots. Cut off the ends to
1cm. The sewing acts as the hinge of the book.
3. Sew figure of eight style as shown in the diagram.
Set off downwards from the top of the volume through the middle
hole. Note that when you return to the middle hole on the way
back, you bypass it, leaving a longer section. Then at the the
end of the run, bring the thread up on the other side of this
longer section, which allows you to knot the two ends A and B as
shown in the second diagram. Make the sewing as tight as you can
before knotting. I use three overhand knots. Cut off the ends to
1cm. The sewing acts as the hinge of the book.
4. Bend the cover into shape, scoring the card if necessary, and place in position round the book to check it. The cover should overlap a little; this will be guillotined off later. Now lay the cover to one side. Glue the spine of the book, and the area you have sewn, front and back, for about a centimetre in from the spine. Place the book in the cover, and grip securely as before for two hours minimum, preferably overnight. When the book is finished, guillotine the three edges to make a neat finish, removing two millimetres of the margins of the book in the process.
 And that's it.
I made a video of the process for people learning English. See Lesson 40 - Book Binding. . . https://youtu.be/RrSHsQtOEvU . The spoken words are deliberately slow.
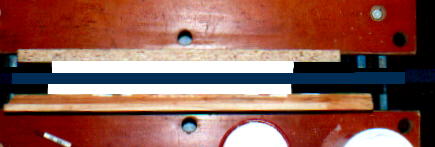
The key part of the procedure
is keeping the paper flat during gluing, as it will crinkle and
warp if you give it a chance. I use my Workmate, and made an
arrangement from two short planks of wood which supports the
pages from underneath. The next three pictures show the support
in the vertical and horizontal planes, and how it fits in the
workmate (viewed from above). In the vertical view, I am gluing
two books at once, held in place by extra pieces of wood. I have
found that simply using weights when gluing is insufficient -
there needs to be as much pressure as you can manage.
Suggested reading : Bookbinding, A beginner's Manual, John Ashman, A & C Black, London,1981, ISBN 0 7136 2113 3 : Bookbinding, A Manual of Techniques, Pamela Richmond, Crowood Press, Marlborough, 1989, ISBN 1 85223 175 0.
Thank you, David Pennant